Next Cloud Synchronization
NextCloud allows you to setup your own private cloud storage where all of the data is owned exclusively by you. Your data is not stored anywhere publicly, it's not accessible by any corporate entity, it's not sold, it's yours and stored on your server. But how do you get the benefits of synchronization between devices just like you would with a cloud provider, like, for example: google? This sections walks you through synchronization of the following items:
- Contacts
- Calendars
- Photos
Content can be synchronized to many locations, however, this page will specifically walk you through synchronization and best practices for the following clients:
- Outlook - Contacts & Calendar
- Android - Contacts, Calendar, & Photos
- iOs - Contacts, Calendar, & Photos
Before you Start
Prior to proceeding with any of the below steps, please confirm your access url, username, and password by logging into your account. For example, http://buerer.net/NextCloud. If you have any problems logging in, please contact your NextCloud administrator. If you plan on synchronizing your photos from your phone, just after logging into the server is a good time to generate the QR code needed below. See "Android Setup - Photos"
Android Setup - Photos
Photos (and other files)can be synchronized from your phone to your cloud account using the NextCloud app. Photos can be setup to automatically sync only when you're connected to wifi or synchronized anytime!
Quick Setup Instructions
- Generate a QR Code for the app
- Log in to your Next cloud account at your server's URL, ex: https://buerer.net/nextcloud
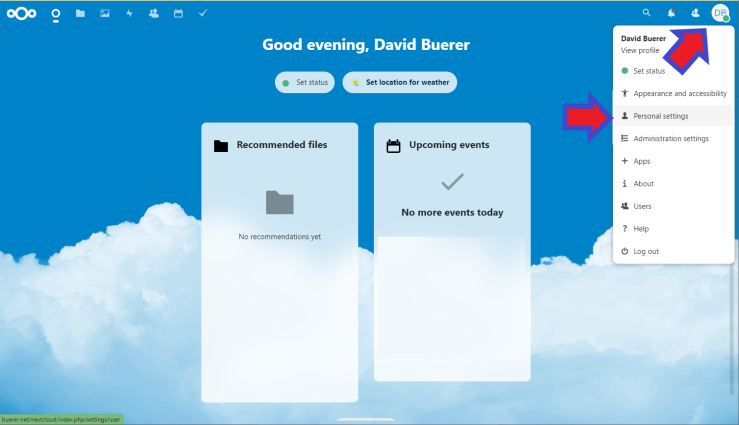
- Click on your personal icon in the upper right hand corner of the screen, select Personal Settings
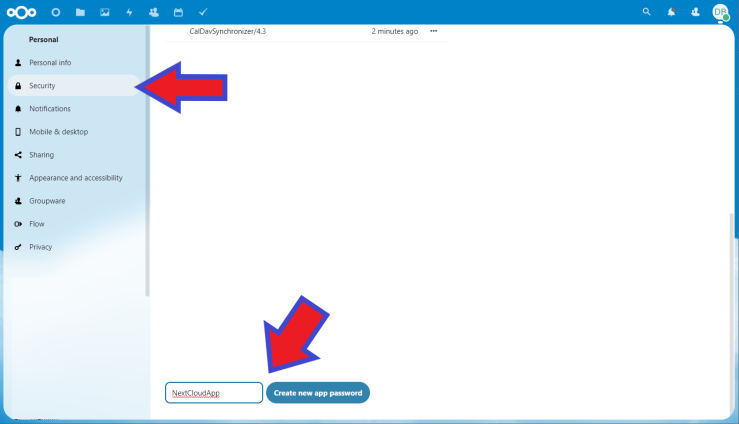
- Select the Security tab, then scroll down to the bottom of the screen where it says "Create New App Password"
- Enter a unique name for the device you are going to enroll, then, press the "Create App Password" button. After that, select the Show QR Code Button" You may need to reconfirm your NextCloud password
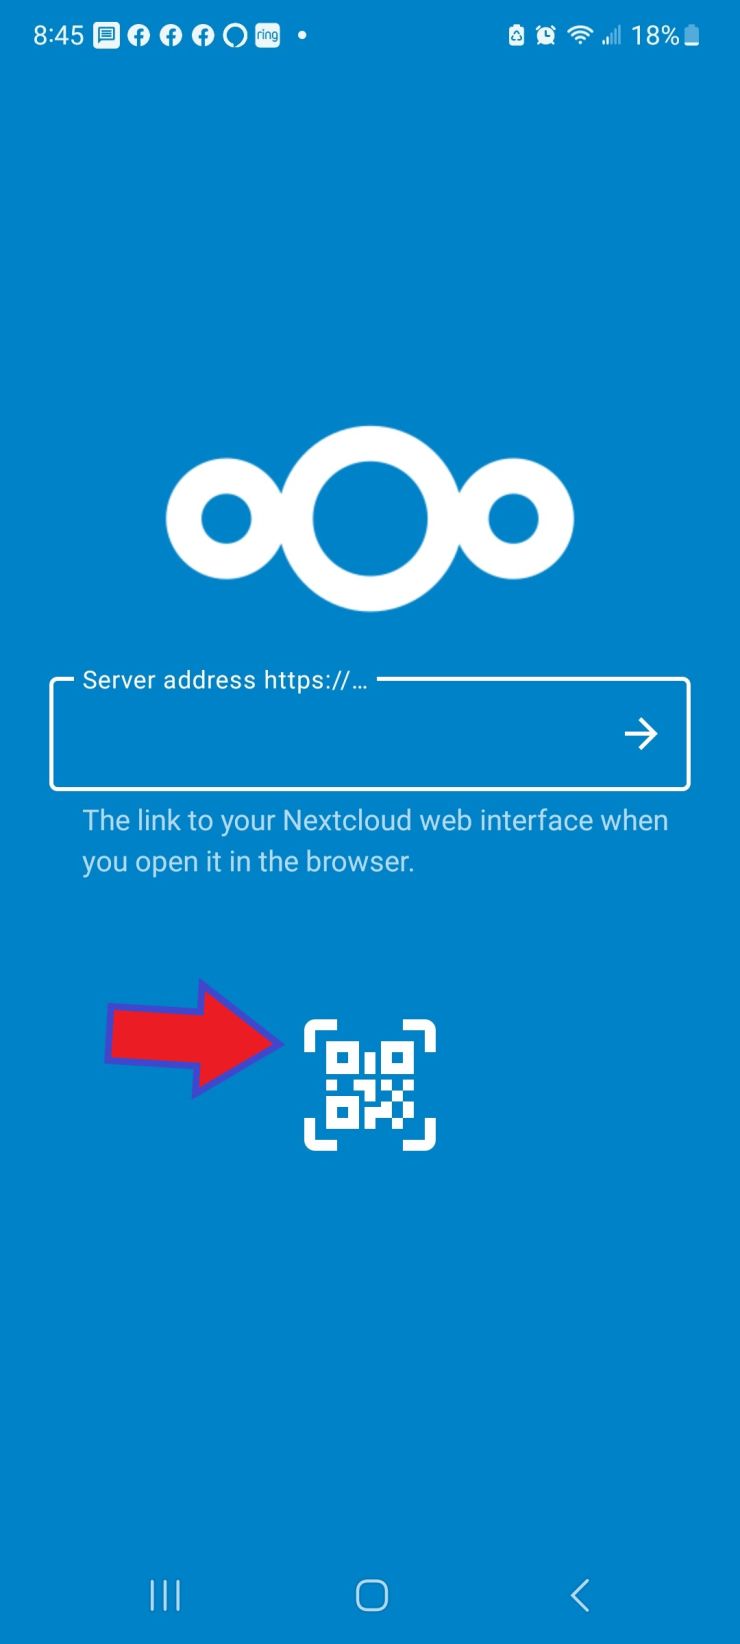
- A QR code should now be visible on the screen
- Connect your phone to the server
- Download the Next Cloud app from your play store https://play.google.com/store/apps/details?id=com.nextcloud.client
- Add a new account
- Select the Icon to Scan a QR Code, grant permissions to your app if needed, then scan the code from step #1
- Your account will automatically set itself up!
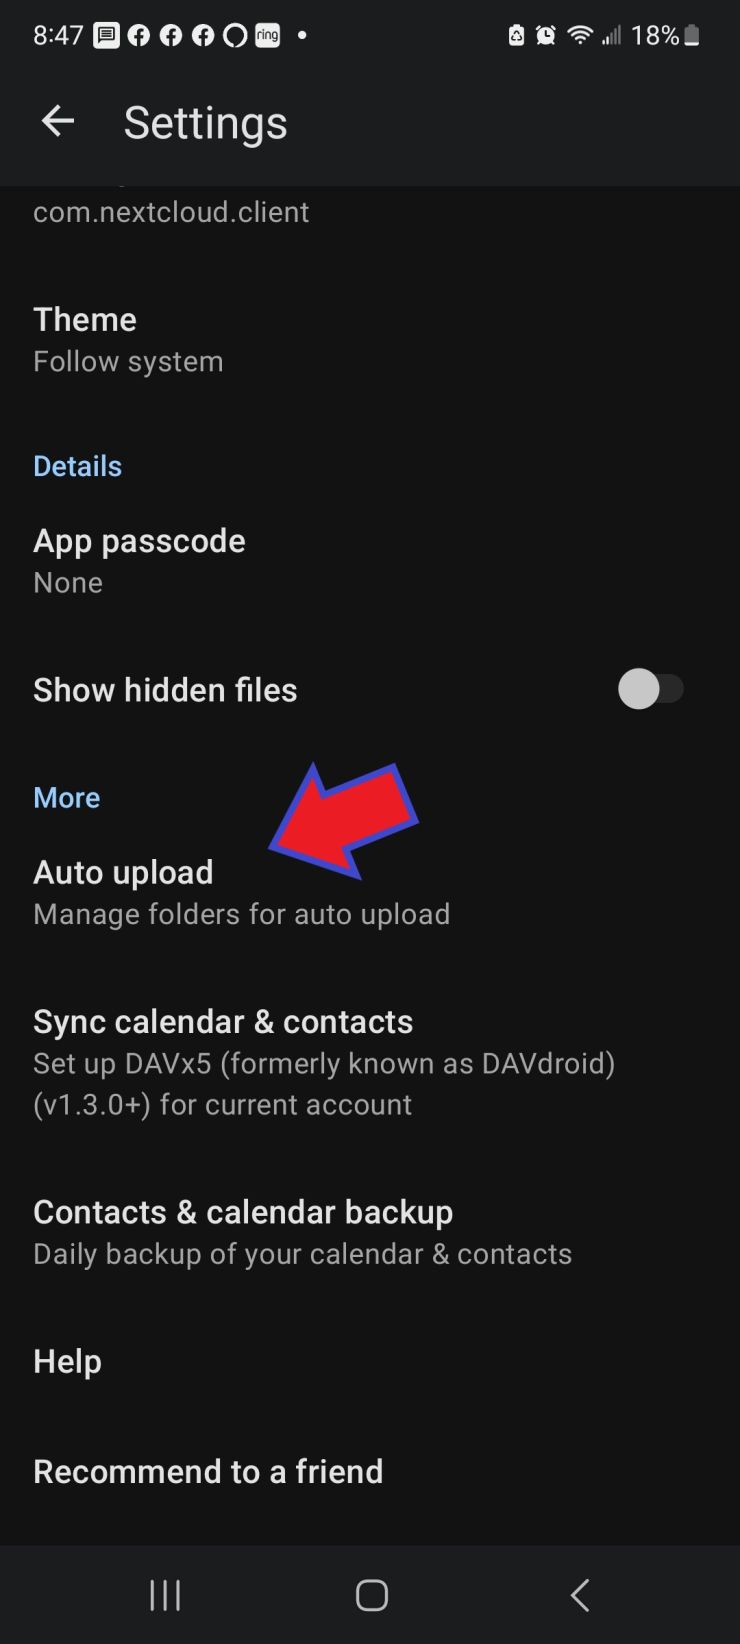
- Configure the App to automatically upload photos
- Go to the App settings
- Select Auto Upload
- Click the Cloud icon next to the folder(s) you want to automatically upload.


Outlook Synchronization of Contacts & Calendars
Synch of contacts and calendars by using a freely availbale client which is installed as an add-on to Outlook.
Quick Steps
- Close Outlook
- Download Add on From: https://sourceforge.net/projects/outlookcaldavsynchronizer/
- Open Outlook
- Create new profile for Calendar
- Select + button to add new profile
- Select Next cloud
- On the new profile page
- Set name to Calendar
- Select Calendar folder
- In the URL section, replace server.example.com with your domain name (ex buerer.net)
- enter your username, password, and email address
- Select Test an Discover Settings
- Hit save profile button after successful test
- A completed profile page will look similar to this:

- Repeat the above steps for Contacts & Tasks
Detailed Steps
For detailed steps with ample pictures, please refer to this link: https://nextcloud.com/blog/nextcloud-offers-caldav-synchronizer-for-outlook-users/
Android Setup - Calendar, Contacts, Tasks
These steps will allow you to synchronize contacts, calendars, and tasks between your NextCloud server and your Android phone or tablet. The basic steps are to install a caldav/carddav client on your phone, set it up,and you're done! Ultimately you can use any client you like, however, the recommended one, even if it costs a few dollars, just simply works.
Quick Steps
- Purchase and install DAVx5, https://play.google.com/store/apps/details?id=at.bitfire.davdroid
- Startup the app, on the main screen press the + button to create a new account
-

-
- Enter your email address and Password for your NextCloud acount. This is not the username and password you use for email...this is for your NextCloud. System will automatically discover setting then take you to the Create Account Screen
- Create Account - on the create account screen, accept the defaults and select "Create Account"
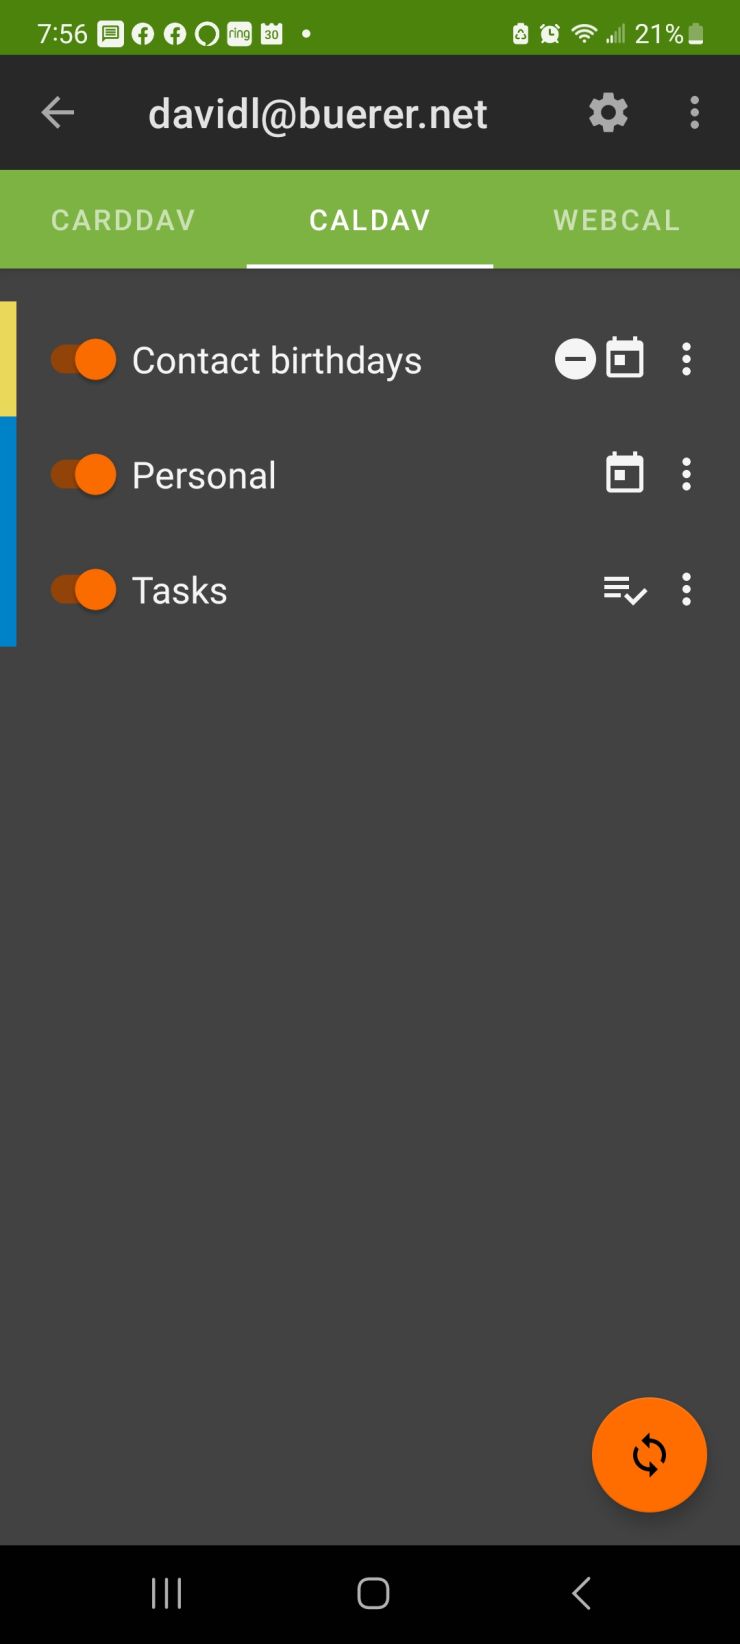
- Once the initial sync is done, on each tab (CALDAV & CARDDAV) enable the calendars, contacts, and tasks you'd like to sync
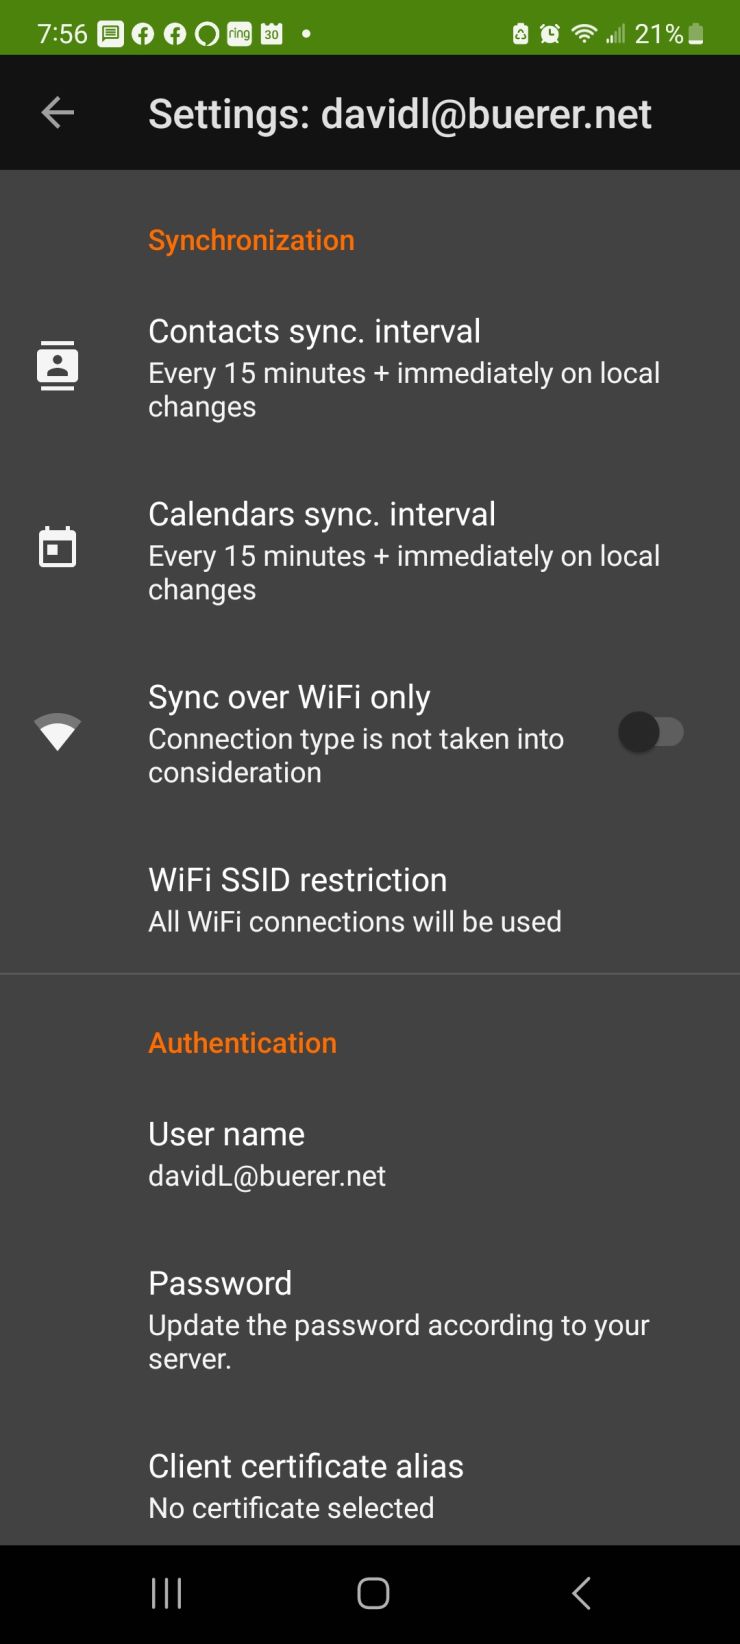
- Access the settings page using the gear icon for the account, set the sync interval to a time period you are comfortable with


Details Steps
For detailed setup instructions, please see the DavX website at https://manual.davx5.com/